Handlers
Handlers are methods inside a Jovo component that are responsible for handling a request and returning output.
Introduction
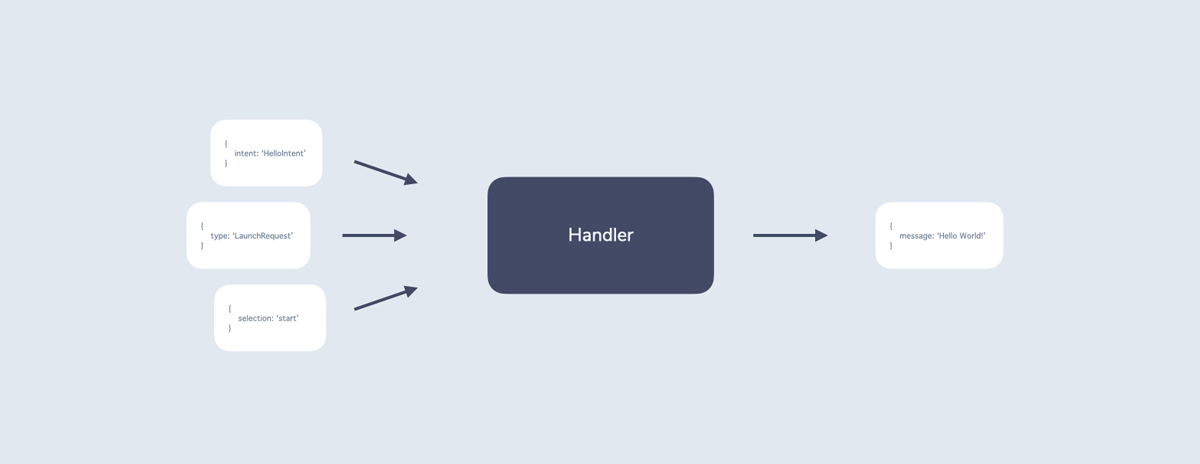
A handler can fulfill multiple types of requests, like intents and touch selections, and then return output.
A component usually has multiple handlers. The @Handle decorator is used to define which handler should be responsible for which type of request. For example, one or multiple intents can be added as intents, and a handler can be even more specialized if you add conditions like platforms. Learn more about handler routing below.
import { Handle } from '@jovotech/framework';
// ...

@Handle({ /* handler options */ })
yourHandler() {
  // ...
}
The inside of a handler defines its logic. In the end, each handler should either return some output using the $send() method, or redirect/delegate to a different handler or component. Learn more about handler logic below.
yourHandler() {
  // ...

  return this.$send('Hello world!');
}
Handler Routing and the Handle Decorator
The routing defines which handler should fulfill the incoming request. For example, each intent in your language model should have at least one handler that responds to it, otherwise the Jovo app might throw an error.
Similar to previous versions of Jovo, it is possible to name a handler exactly like the incoming intent it is supposed to respond to:
ShowMenuIntent() {
  // ...
}
This does not offer a lot of flexibility, though. For better control, we recommend using the @Handle decorator. It contains a set of elements that define when a handler should be triggered. This way, you can even add multiple intents and name the handler however you like.
For example, this handler responds to both the ShowMenuIntent and YesIntent:
import { Handle } from '@jovotech/framework';
// ...

@Handle({
  intents: ['ShowMenuIntent', 'YesIntent']
})
showMenu() {
  // ...
}
Learn more about the @Handle decorator here.
It's possible that multiple handlers are able to fulfill a request, for example:
@Handle({
  intents: ['ShowMenuIntent']
})
showMenu() {
  // ...
}

@Handle({
  intents: ['ShowMenuIntent'],
  platforms: ['alexa']
})
showMenuOnAlexa() {
  // ...
}
If this is the case, the handler with more conditions is the one being prioritized. In the above example for a request coming from Alexa, the showMenuOnAlexa handler would be triggered.
Learn more about handler prioritization in the routing docs.
Handler Logic
Inside a handler is typically where the conversational logic is happening.
You can access all Jovo-related methods using the this context. For example, this is how you can write user data into a database:
yourHandler() {
  // ...

  this.$user.data.someKey = 'someValue';

  // ...
}
A handler usually concludes with one of these tasks:
- Return output using
$send() - Redirect to a different component using
$redirect() - Delegate to a component using
$delegate() - Report back to a delegating component using
$resolve()
Return Output
In most cases, the goal of a handler is to return output to the user using the $send method.
yourHandler() {
  // ...

  return this.$send(/* output */);
}
You can find more information on output here.
Redirect to Components
If you $redirect() to a different component, the current $state stack is cleared. You can see this as a permanent redirect. We recommend redirects if you want to move from one isolated part (or component) of a conversation to another. If you want to keep the state when moving between components, we recommend using $delegate().
If no handler name is specified, the redirect triggers the other component's START handler.
import { AnotherComponent } from './AnotherComponent';
// ...

yourHandler() {
  // ...

  return this.$redirect(AnotherComponent);
}
You can also specify the name of a handler:
import { AnotherComponent } from './AnotherComponent';
// ...

yourHandler() {
  // ...

  return this.$redirect(AnotherComponent, 'someHandler');
}
Delegate to Components
By using the $delegate method, you can redirect to a different component and let it know that after successful delegation (when the delegated component resolves), the flow should be returned to the current component.
// src/components/YourComponent.ts

import { YesNoComponent } from './YesNoComponent';
// ...

yourHandler() {
  // ...

  return this.$delegate(YesNoComponent, {
    resolve: {
      yes: this.onYes,
      no: this.onNo,
    },
    config: {
      // ...
    }
  });
}

onYes() {
  // ...
}

onNo() {
  // ...
}
The following options can be added to $delegate():
resolve: Handlers that should be called after the child component resolves with certain data.- Can include references to handler functions like
this.onYes(doesn't work with anonymous functions) - Can include a string to the handler key:
'onYes'
- Can include references to handler functions like
config: The config that is used by the child component. Can be accessed inside the child component withthis.$component.config.
In the above example, the $state stack gets updated like this:
$state = [
  {
    component: 'YesNoComponent',
  },
  {
    component: 'YourComponent',
    resolve: {
      yes: 'onYes',
      no: 'onNo',
    },
  },
];
It's also possible to define an enum for resolve events:
// src/components/YesNoComponent.ts

export enum YesNoComponentEvent {
  Yes = 'yes',
  No = 'no',
}


// src/components/YourComponent.ts

import { YesNoComponent, YesNoComponentEvent } from './YesNoComponent';
// ...

yourHandler() {
  // ...

  return this.$delegate(YesNoComponent, {
    resolve: {
      [YesNoComponentEvent.Yes]: this.onYes,
      [YesNoComponentEvent.No]: this.onNo,
    },
    config: {
      // ...
    }
  });
}
You can also pass that enum to the component for type safety:
// src/components/YesNoComponent.ts

export enum YesNoComponentEvent {
  Yes = 'yes',
  No = 'no',
}

class YesNoComponent extends BaseComponent<{}, {}, YesNoComponentEvent> {
  // ...
}
Resolve a Component
In our previous example, a component delegated to another component (e.g. YesNoComponent), expecting it to return a specific result.
After successful handling, the delegated component can use $resolve() to report back:
// src/components/YesNoComponent.ts

YesIntent() {
  // ...

  return this.$resolve('yes');
}
The component is then removed from the $state stack and the delegating component is called, looking for a handler that matches the event that is passed with $resolve() (in the above example yes).
You can also pass data in the second argument. This is especially helpful if the delegation has been used for slot filling. For example, if you have a CityIntent that uses the city entity, you can resolve it like this:
CityIntent() {
  // ...

  return this.$resolve('success', this.$entities.city.resolved);
}
The accepting handler defined in $delegate can use it as a parameter:
onSuccess(city) {
  // ...
}
Handler Types
There are some default handlers that you can use in your components:
LAUNCH
The LAUNCH handler only appears once in every project (typically the GlobalComponent) and is responsible for handling the initial start of the app. On voice assistants like Alexa or Google Assistant, LAUNCH is entered when the app is opened using its invocation name.
LAUNCH() {
  // ...
}
START
START is entered when a component is redirected or delegated to without a specified handler name. We recommend using START in every component as best practice.
START() {
  // ...
}
It's also possible to add intents to the START handler. If you want the handler to be reachable from outside the current component, make sure that you're setting the intent global, not the whole handler, as described in the @Handle docs. Setting the whole START handler global could lead to problems with multiple handlers of the same name being global.
@Handle({ intents: [ { name: 'TableReservationIntent', global: true } ] })
START() {
   ...
}
UNHANDLED
UNHANDLED is called when no other handler in the current component can fulfill the current request. It can be seen as a catch-all of handlers in one specific component.
UNHANDLED() {
  // ...
}
By default, the current component's UNHANDLED gets prioritized over global handlers in other components. Learn more about UNHANDLED prioritization in the routing documentation.
Middlewares
The event.ComponentTreeNode.executeHandler event middleware gets called every time a handler is executed. For example, you can hook into it like this:
app.hook('after.event.ComponentTreeNode.executeHandler', (jovo: Jovo, payload): void => {
  // ...
});
The payload includes the following properties:
componentNamehandler